How to create workflows and actions on GitHub
This is a tutorial to create a great workflow and action within your GitHub. For this case we will create a Helm dispatcher as an example of its capabilities.
Setup #
You would need these things first. I’ll try to be OS-agnostic, although you might be using Linux as a runner for GitHub.
There are various cases for you, choose what suits you best. But you have to create a repo on GitHub first. This is mine and it could serve as an example.
Local environment advice for virtualization #
Create the runner #
It’s straightforward, just follow the GitHub’s guide on Actions > Runners > New self-hosted runner.
Create the action #
In your repo, create this structure:
│   action.yml
│   Dockerfile
│   README.md
│   Values.yaml
│
└───.github
    └───workflows
            install.yaml
            uninstall.yaml
action.yml and Dockerfile will serve us as the action. .github/workflows/*.yaml are our Actions Workflows that will use the same repo as the action. Values.yaml is for our Chart, you could leave it empty if you wish or import it from another repo.
This is our Dockerfile:
FROM alpine:3.20
RUN apk add helm
WORKDIR /wd
COPY . /wd
ENTRYPOINT [ "helm" ]
Pretty simple, isn’t it?
Next, we have there our action.yml file:
name: "Helm Action"
description: "Perform someting with Helm in the cluster"
inputs:
  kubeconfig:
    description: "The path to the kubeconfig file"
    required: true
    default: "./kubeconfig"
  chart:
    description: "The chart to install"
    required: false
    default: ""
  release:
    description: "The release name"
    required: true
    default: "helm-example"
  version:
    description: "The chart version"
    required: false
    default: ""
  namespace:
    description: "The namespace to install the chart"
    required: true
    default: "default"
  command:
    description: "Command for the Helm action"
    required: true
    default: "upgrade"
  values-file:
    description: "Values file for the Helm chart"
    required: false
    default: "Values.yaml"
  values:
    description: "Values for the Helm chart"
    required: false
    default: ""
runs:
  using: "composite"
  steps:
    - name: "Build Docker image"
      shell: sh
      run: docker build -t helm-action .
    - name: "Installing or upgrading Helm chart"
      if: ${{ inputs.command == 'install' || inputs.command == 'upgrade' }}
      shell: sh
      run: |
        docker run --rm -v $PWD:/wd helm-action \
        ${{ inputs.command }} \
        ${{ inputs.release }} \
        ${{ inputs.chart }} \
        --version \
        ${{ inputs.version }} \
        -n \
        ${{ inputs.namespace }} \
        --create-namespace \
        -f \
        ${{ inputs.values-file }} \
        --kubeconfig \
        ${{ inputs.kubeconfig }}
    - name: "Uninstalling Helm chart"
      if: ${{ inputs.command == 'uninstall' }}
      shell: sh
      run: |
        docker run --rm -v $PWD:/wd helm-action \
        ${{ inputs.command }} \
        ${{ inputs.release }} \
        -n \
        ${{ inputs.namespace }} \
        --kubeconfig \
        ${{ inputs.kubeconfig }}
We’re using composite as it allows us to add if steps in an easy way. Perhaps it’s easier to create an entrypoint script and use it instead but I want to show you the capabilities of GitHub Actions.
Create the workflow #
We’re going to install Valkey as an example pipeline
Append the Kubeconfig as an environment secret #
First of all we need the kubeconfig file and append to the environment’s secrets.
You do it this way:
- Enter your repo settings and create a environment. I will call it
local.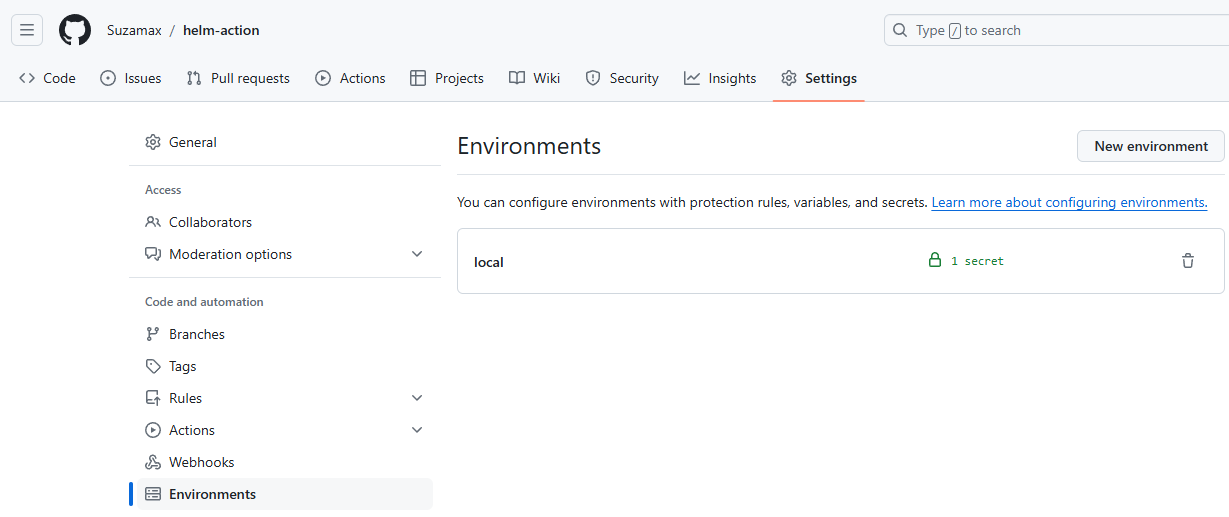
- Create an environment secret called
KUBECONFIG.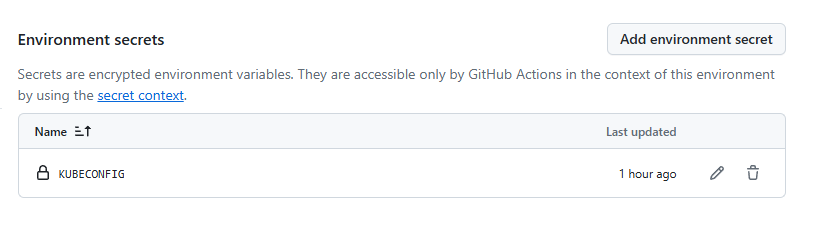
- Append your
kubeconfigfile into it as value.- Notice you have to point to a valid location. If using Minikube remember to use its
eth0IP instead ofcontrol-plane.minikube.internal.
- Notice you have to point to a valid location. If using Minikube remember to use its
Create the workflows #
We have created two workflows: one for installing the Helm Chart and another to uninstall it. Notice they’re almost the same, with subtle diferences. Also, keep in mind you would need to point out your environment to use the secret!
Install (and upgrade) workflow #
name: "Install Workflow"

on:
  workflow_dispatch:

jobs:
  runner-job:
    runs-on: self-hosted
    environment: local
    steps:
      - name: "Checkout"
        uses: actions/checkout@v3
      - name: "Configure kubeconfig"
        run: |
          cat <<EOF > ./kubeconfig
          ${{ secrets.KUBECONFIG }}
          EOF
      - name: "Install a Valkey chart"
        uses: ./
        id: install
        with:
          kubeconfig: "./kubeconfig"
          command: "install"
          chart: "oci://registry-1.docker.io/bitnamicharts/valkey"
          release: "valkey"
          version: "0.3.10"
          namespace: "default"
          values-file: "./Values.yaml"
Uninstall workflow #
name: "Uninstall Workflow"

on:
  workflow_dispatch:

jobs:
  runner-job:
    runs-on: self-hosted
    environment: local
    steps:
      - name: "Checkout"
        uses: actions/checkout@v3
      - name: "Configure kubeconfig"
        run: |
          cat <<EOF > ./kubeconfig
          ${{ secrets.KUBECONFIG }}
          EOF
      - name: "Uninstall a Valkey chart"
        uses: ./
        id: uninstall
        with:
          kubeconfig: "./kubeconfig"
          command: "uninstall"
          release: "valkey"
Running the workflow #
As we specified it as manual, we have to disspatch those workflows in the Actions tab.
Conclusion #
It’s pretty easy to hack in the GitHub Actions possibilities. Maybe you could get in the surface, but this possibly helps you get a better vision of how to create a workflow and action within your organization.